
Email Setup Details:
Configuration details on the stormdesigns server to help you to configure your email clients. Below see screen shots and detail information on MicroSoft Outlook (Express v.) See details and screen images below.
First thing to do is launch Outlook Express*
Outlook Express is shown as this is the freeware open version bundled into every copy of windows. Outlook's premium versions function nearly identically though words and some screen layouts may change.
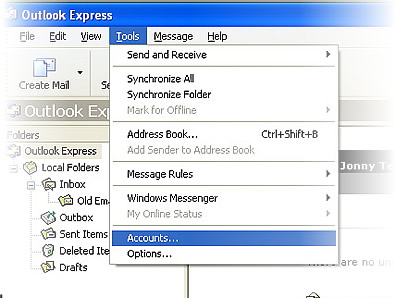
1. Lauch outlook, then see menu's. Find the Tools, menu, and it's sub, the "Accounts..." Menu as shown. Release mouse on Accounts... and a dialog opens.
Add an account or configure an existing email user account.
So currently our network server has an email account waiting for you. That means there is a mailbox set to receive mail at a specific address (ie. you@yourDomainName.com), and it is set up to allow you to receive and send outgoing mail by connecting to it. You need to now indicate to outlook how to connect to the mailbox (incoming mail) and send mail out (outgoing mail) To do so you will need to either add an account or configure an existing one to collect and send mail through our server.
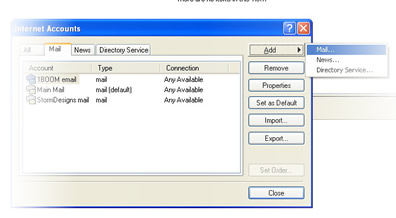
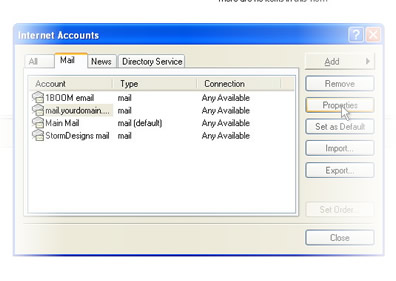
On the Internet Accounts panel which opens you'll see an option to view all accounts or just Mail, News, etc. You can double-click the name of an account and open the "Properties" dialog (shown below) to make changes or use a built-in Wizard to add a new mail account.
Adding a new account...
When using the wizard, enter the data as shown on the support page here. If, when you complete that, the mail does not come and go as intended, you may need to review the settings shown below and make sure that Outlook has configured itself correctly to send and receive mail through our network.
The graphic above shows you that when when you click the "Add" button from that dialog, you will see you can add a new "Mail" account by releasing it on "Mail..." Do this, then follow these directions, come back here if you need more or that doesn't get mail working as intended.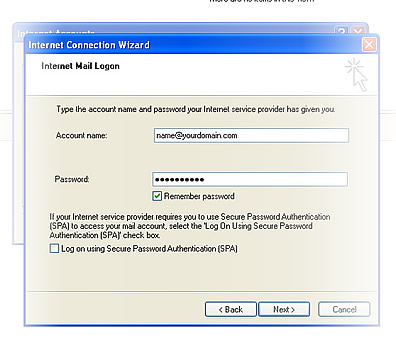
Using the Wizard
So if you're using the wizard go through the screens, click the "Next" button and refer to the support page for correct information required. If you do all of that and it doesn't connect, you'll use material below to return and edit the account. Won't take long, 5 ~ 10 minutes max and less than a minute once you know what settings apply!
Configuring an account.
Configuring an Email account
If you select an account already created you can either "double click" on the account name, or select (highlight) the account name and click the Properties button as shown in the image above (right side) When you click "Properties" the screen below will appear.
Selected is the "General" tab. Does yours appear like the image below?. Read below for the details on this screen.
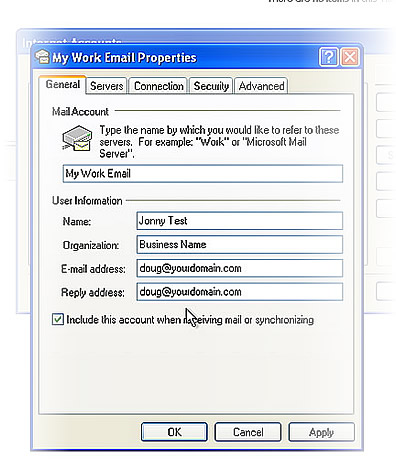
the "General" Tab
Note, the Mail Account name is whatever you want to name the email account. Make it a name that allows you to identify what the account is. Maybe it's your work account, your sports account, your personal. etc. Whatever you like.
2. Name should be YOUR personal name. This is how your mail will appear to those receiving your email. Maybe you want to use a surname here, or your business name. But generally I go with my name. Circumstances may be unique.
3. Organization, only needed if you're a business user. Since you probably are, what is the name or brand of the business? Enter that here.
4. Email and Reply address, set these both to your full email address.
Next Select the Servers Tab. Does your share details with the one shown? If not, let's review the details below.
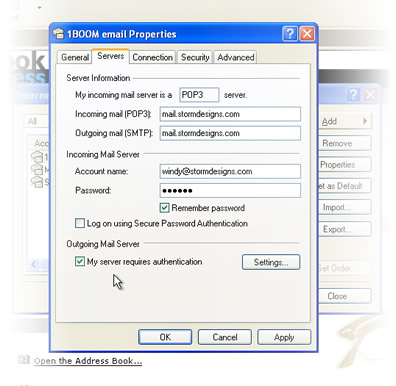
Servers Tab
These are critical. and btw, should not be set to StormDesigns.com, but should be set to whatever your business domain suggests. If your website is www.mywebsite.com, set this to mail.mywebsite.com. If your website or hosted mail account is at www.hujiwhatzis.com, then set incoming and outgoing mail servers to mail.hujiwhatzis.com and so forth.
Account name: This can be tricky as Outlook often defaults this to be only the part of the address BEFORE the domain address. You may need to add your domain name to the "Account Name" as shown above. If this appears as just "wendy", you may need to change it to wendy@hujiwhatzis.com. Make sure this field contains your FULL email address.
Wether you set it to remember the password is case-specific
Do NOT select "Log on using Secure Password Authentication".
DO select "My server requires authentication" under the outgoing mail Server section, then make sure to click the "settings" button to its right and verify the following screen.

This assures it is using the same user name and password as the incoming mail server. Go ahead and click "OK" here to close this dialog if it's set as shown.
Next thing is to select the "Advanced" tab to make certain we don't have any issues that could be problems down the road.
The Advanced Tab (& the Port 26 issue)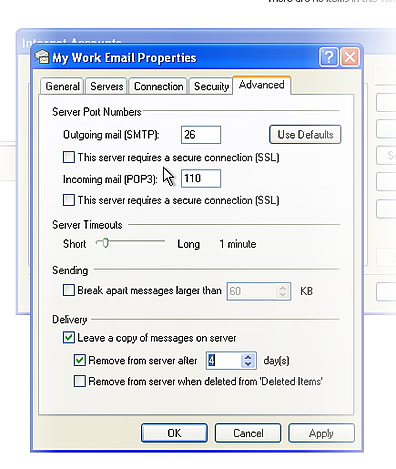
The advanced tab let's us confirm a couple of things...
1. The Outgoing Mail (SMTP) port is set by default to "25". If you are having trouble connecting to the outgoing mail server (sending mail out) you may need to change this to "26". If you travel with your computer you may want to do this anyway. It's a small technicality but SOME isp services have trouble sending outgoing mail through port 25 and this may or may not need to be set to 26.
For the full version of outlook it is very similar but note:
Open Outlook. Within Outlook, navigate to the Tools menu and select Accounts.
Double-click your account and click More Settings button.
Navigate to the Advanced tab and change the SMTP port to port 50. Test the connection by opening a command prompt and entering in the following (where mail.domain is your email domain or email server...
(Back to Outlook express...)
Under delivery you'll notice we set outlook to "Leave a copy of messages... and to remove them after 4 days. You can set this where you're comfortable.
Note though that in order to prevent your need for a large private server we encourage you to download the mail to your local computers copy of Outlook and keep a local archive and backup. In order to keep your disk requirement needs smaller, you should remove mail when you check mail. The setting above will leave copies on the server for 4 days "just in case". When you check mail using outlook, it will look at the server and any messages received more than 4 days prior will be deleted there, but still saved in your local copy of outlook.
Note Mail Capacity: In most cases email boxes are set to between 25 ~ 35 Megabytes of capacity. This can be enough for anywhere between 5 and 500 photos or similar data. (why it can be tricky) if your associates send many LARGE image files or other large files you may need more capacity or to be sure you remove mail quickly and frequently. If not the case, then 25MB may be well more than enough email box for your uses. Let us know if you need more disk space, it can always be arranged.
You're pretty much done now!
These are all of the most important settings which apply to configuring outlook to collect your email from the StormDesigns network server systems. If you have questions please use our contact form or call us for immediate support. All you need to do now is click any "Ok" in the way (The Properties and the Internet Accounts" windows) and then try to receive and send mail using this account from MS outlook. We hope it goes easy and smoothly. If not, please let us know.
The art of Craving

What do you crave?
The science of market is heavily reliant on tapping into a need, an itch. Then fulfilling it.